Ninja AI is a versatile tool, but getting the best results depends on how you use it. This guide covers simple strategies—like being clear, specific, and iterative—that will help you maximize its potential and make your interactions more productive and efficient. Let’s dive in!
Be clear about your intent
When you interact with Ninja AI, its primary goal is to understand your intent and respond effectively. Most of the time, it can quickly interpret what you need. However, there are instances when it might not fully grasp your exact intent—especially if your prompt is vague or open to multiple interpretations.
To get the best results, be as specific as possible when crafting your prompt. For example, instead of asking, “What’s the best way to market a product?” try something like, “What are some effective social media strategies to market a new eco-friendly water bottle?”
One powerful tool at your disposal is Agent Shortcuts. These allow you to direct Ninja AI to respond using a specific agent, ensuring you get a focused and precise answer tailored to your needs. Here’s a quick guide to the available shortcuts:
- Research Agent: Use /researcher to gather insights from the internet and AI models.
- Image Agent: Use /image to create or edit images.
- Writer Agent: Use /writer to get help with written content like blog posts, UX copy, or creative writing.
- Code Agent: Use /coder for technical programming questions or tasks.
- Schedule Agent: Use /scheduler to schedule meetings.
By specifying your intent clearly and leveraging these shortcuts, you can significantly enhance your experience with Ninja AI, ensuring you receive the most relevant and accurate responses.
Write the best AI prompts
The more specific your prompt, the better the response you’ll receive from Ninja AI. Providing ample context not only helps Ninja understand your request but also ensures that the response is as accurate and relevant as possible.
So, what does it mean to be specific when creating a prompt?
Think of it as giving Ninja a clear roadmap to follow. Include as much relevant detail as you can about what you need, the format you prefer, and any expectations for tone or style. For example, if you want Ninja to draft an email in a particular format, show it an example of the layout or language you have in mind. Similarly, if you ask for research, specify the depth of detail or the type of sources you prefer. These small additions can significantly improve the quality of the response.
If you’re unsure of exactly what you’re asking for or how to phrase it, don’t worry—Ninja offers tools to guide you:
Prompt Improver
If your initial prompt feels vague or incomplete, this tool uses AI to refine and enhance it. Simply input your prompt, and the improver will suggest a more precise version to help you get better results. To use the prompt improver simply click the Improve Prompt button at the bottom of the Prompt Box.
Prompt Library
For those times when you don’t know where to start, the prompt library is an invaluable resource. It offers a curated collection of prompts organized by job function and role, making it easy to find examples tailored to your needs. Whether you’re looking for inspiration or a template, the library is a great starting point.
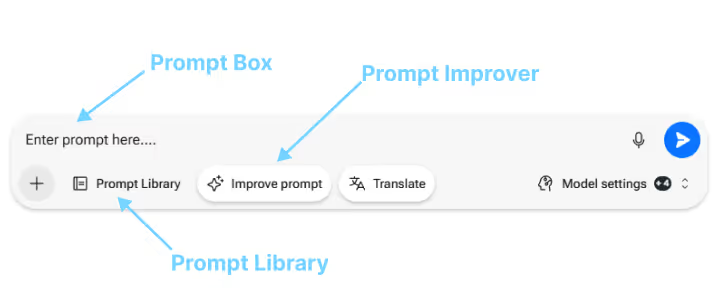
By being specific and leveraging these tools, you can create the best AI prompts to make the most of your interactions with Ninja, getting the response you want, quicker.
Iterate and Refine
When working with Ninja AI, perfection isn’t required on your first try. A big part of using AI effectively is treating it as a collaborative process. Remember, Ninja isn’t simply retrieving an answer—it’s creating a response in real time based on its training and your specific prompt.
As you receive responses, you might gain new insights that change your approach. Don’t hesitate to refine your prompt, ask follow-up questions, or explore different angles. This iterative process helps you navigate to the best outcome. For example, if a response isn’t quite what you expected, let Ninja know why. Feedback like “This tone feels too formal; can you make it more conversational?” or “I was hoping for more examples in this answer” allows the system to better align with your expectations.
By actively engaging in this back-and-forth, you’re not just using AI—you’re building a dialogue that leads to more refined and relevant results. Collaboration and iteration are key to getting the most out of Ninja AI.
Use a new chat for a new topic
When engaging with Ninja AI, it’s important to understand how its memory works. Each chat session has its own memory, meaning the system retains context about your conversation within that chat. While this can be incredibly helpful for staying on topic, it also means that unrelated topics can create unintended overlap or confusion.
To get the best results, it’s a good practice to keep each chat focused on a single topic. For example, if you’re working on an email to a work colleague, keep the conversation limited to that task. If you then ask for dinner recipe ideas within the same chat, the context from your earlier discussion might inadvertently influence the new response, leading to less accurate or relevant answers.
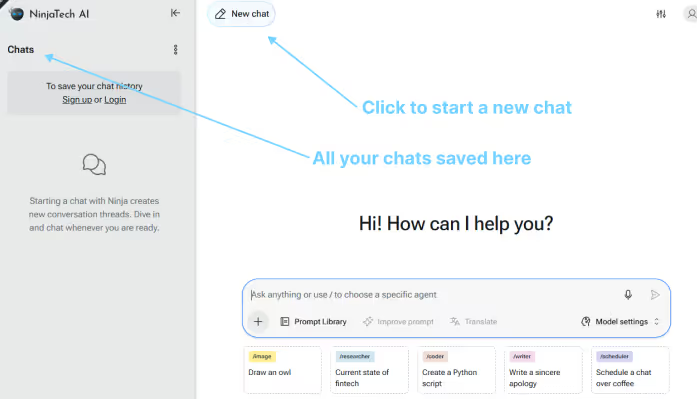
By starting a new chat for each distinct topic, you’ll ensure Ninja stays focused on your current needs, providing clearer and more effective responses.
Tips for better images
To create vivid, accurate images with Ninja AI focus on a clear and detailed prompt. You can also configure your image settings in the Ninja Agent settings panel.
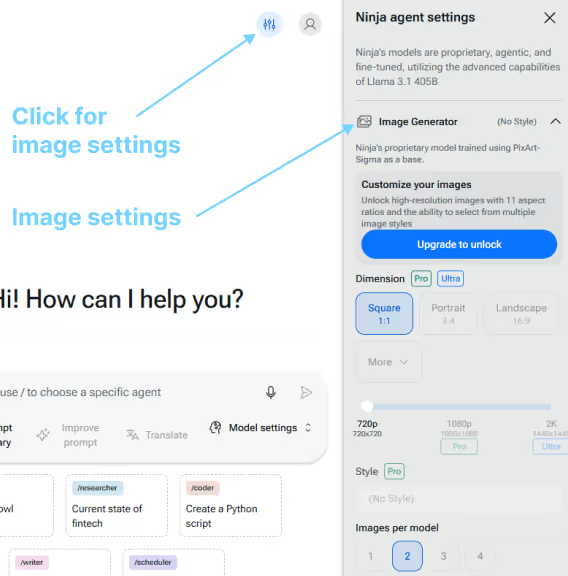
Here are some tips to ensure your image requests turn out exactly as you envision:
1. Be Clear and Specific: Describe the subject, setting, and mood. Instead of “a dog,” try “a golden retriever puppy playing in a grassy park on a sunny day.” If the subject could have multiple interpretations, add context. For example, specify “a jaguar in the jungle” (animal) versus “a jaguar on a racetrack” (car).
2. Define the Style and Format: Indicate if you want the image to be photorealistic, cartoonish, abstract, or in a specific artistic style (e.g., “a watercolor painting of a cottage in the woods”). Mention details like orientation (portrait, landscape, square) and focus (close-up, wide shot). You can easily modify these settings directly in Ninja.
3. Use Adjectives and Modifiers: Use adjectives like “vibrant,” “mysterious,” or “minimalist” to guide the image’s tone. Add details to refine the setting, such as “a city skyline at sunset with soft golden light” or “a stormy ocean with dark clouds.”
4. Add Context for Composition: Specify key elements for each. For example, “a snowy mountain range with a small wooden cabin in the foreground.” Include what’s happening. For instance, “a child flying a kite on a beach, with waves crashing in the background.”
5. Specify Colors and Themes: Define your desired palette, such as “a pastel pink and blue theme” or “monochrome black and white.” Indicate a style or era, such as futuristic, vintage, or rustic.
6. Use Shortcuts for Efficiency: Use the /image shortcut to route your request directly to the Image Agent. This ensures your prompt goes to the right place and maximizes precision.
By following these tips, you can create stunning, highly tailored visuals that match your vision.

